Name Skeletons!
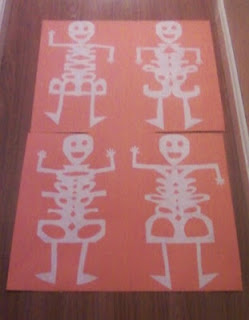
I promise, I don't get paid anything for mentioning Pinterest. I just love it. Wholeheartedly. I found this project on Pinterest about 3 months ago and became pretty obsessed with it. I knew this was a Halloween must. I'll go ahead and show you the finished result! (My camera is still broken. Bummer. Had to take these with my phone.)
Cute, right? You only need a few basic materials:
*A few sheets of plain white paper. The stuff you use in your printer works awesomely. I cut out hands, heads, and feet in groups but one skeleton would probably take 2-3 sheets.
*A pencil or pen
*Scissors
*Glue
*Poster Board (if you cut these smaller you could probably fit them on construction or scrapbook paper. GAH! These would be cute in a scrapbook! Now I have to make them again in miniature.)
The first thing you want to do is take one sheet of the white paper and fold it in half lengthwise with the open end at the top and the folded end at the bottom.

Next, write your name (or your kid's name, dog's name--whatever floats your boat) in cursive on the folded sheet of paper filling up the sheet. You can see I stretched "Mom" out but I also tried this with Jennifer and I was able to fit it on there too.

Cut out around the top and sides of the name leaving a bit of space around the pencil marks. Don't chop up that folded side just yet!

Now, cut around the bottom. But be careful. You want it to stay joined with just some parts cut out. You don't want to go around the letters like you did on the top. Just a snip here and there should do it!

Open it up and marvel at how much your name looks like a skeletal torso. Does that sound creepy? HA!

You'll want to cut out the head, arms, and legs next. I free-handed those but the head is basically an oval with two circles and a semi-circle cut out. The hands are just L-shapes with 5 digits on the end. The legs are long skinny rectangles with triangular shaped feet. You could make these more detailed if you'd like but I thought this was kind of cartoon-y cute. And since A is freaked out by Halloween this year, this was a safe bet.

Dry fit the pieces on the poster board. You can see in the top photo that our skeletons have different poses. This gives you a chance to play around with placement before you glue the skeleton down.

All that's left to do is glue these on to whatever back piece you'd like. We used orange poster board but you could use whatever. Two of these skeletons fit on a regular 22 x 28 sheet. As I was gluing these down I had the idea that you could paint over these with glow-in-the dark paint. That would be fun!

And there you have it! I was able to crank out four of these in about an hour. This would be a fun project for Halloween or for a class studying the skeletal system. Older kids should be able to do this with very little guidance. Younger kids will need some help. I noticed in the original pin that they also did it with the capital letter of the name at the neck. We did ours as the pelvis. It's totally up to you. Whatever you thinks looks best is probably best!
One more look at the finished project.
If you don't know us personally, do you have any guesses as to what our kids' names are? Don't go peeking at other posts! Try to figure it out!
I'd love to see these if you make them, so try it out and then link to your post in the comments! Or email a picture to me (our email address can be found in the "Contact Us" tab on the right hand side).
Happy crafting!
Jen


Comments